Adding a Logo to DICOM Printer 2 Output
This article is intended for IT staff. It includes XML configuration examples that might be difficult to understand for the non-initiated. If you need help implementing these customizations, please contact our support team.
Recap: Basic Film Output
In our previous post, we covered the installation and configuration of basic film output with DICOM Printer 2. While this setup works for basic use cases, most medical facilities want to include their identity on their printed output.
This guide will show you how to enhance your DICOM output by adding your facility's logo and name to every printed document.
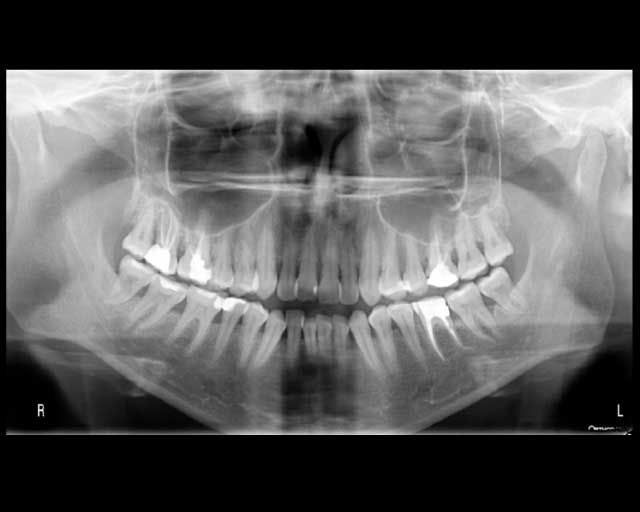
Before: Basic DICOM Output
 Basic DICOM output without customization
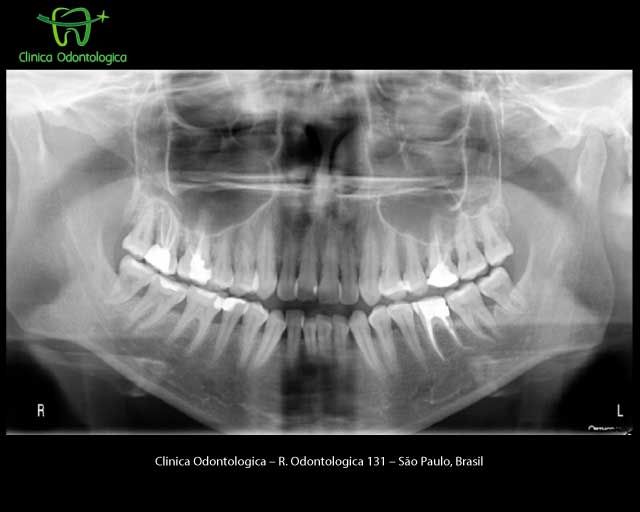
After: Customized DICOM Output
 Enhanced output with facility branding
Adding Your Logo to DICOM Printer 2
Step 1: Prepare Your Logo Image
First, we need to save the logo image to a location where DICOM Printer can find it. The best place for this is the DICOM Printer config folder:
- Open the DICOM Printer Control Center
- Click the shortcut to the configuration folder

- Save your logo in this folder

Logo Image Tips
- Use PNG format for best quality
- Recommended size: 200 x 100 pixels
- The full path will typically be:
C:\ProgramData\Flux Inc\DICOM Printer 2\config\logo.png - On Windows, you can also use the environment variable path:
%ProgramData%\Flux Inc\DICOM Printer 2\config\logo.png
Step 2: Create the PrintImage Action
The logo is placed onto each page using a PrintImage action in your DICOM Printer 2 configuration. Here's how to configure it:
<PrintImage name="addLogo">
<ImagePath>C:\ProgramData\Flux Inc\DICOM Printer 2\config\logo.png</ImagePath>
<X>1</X>
<Y>1</Y>
<Width>16</Width>
<Height>16</Height>
<Aspect>keep</Aspect>
</PrintImage>
Important parameters explained:
name="addLogo"- This identifier will be used to call the action in the workflow<X>1</X>and<Y>1</Y>- Position the logo 1% from the top and 1% from the left of the page<Width>16</Width>and<Height>16</Height>- The logo will be placed in a box that is 16% of the page width and height<Aspect>keep</Aspect>- Maintain the original aspect ratio of the logo image
Step 3: Integrate into Your Configuration
When included as part of your complete configuration, the XML would look like this:
<?xml version="1.0" encoding="UTF-8"?>
<DicomPrinterConfig>
<General>
<CheckingInterval>1</CheckingInterval>
<SuspensionTime>1</SuspensionTime>
<Verbosity>30</Verbosity>
</General>
<ActionsList>
<Print name="PrintOnDevice">
<Resolution>320 x 320</Resolution>
<PrintMode>Grayscale12</PrintMode>
<ConnectionParameters>
<MyAeTitle>DICOM_PRINTER</MyAeTitle>
<PeerAeTitle>DS5302</PeerAeTitle>
<Host>192.168.1.100</Host>
<Port>5040</Port>
<AssociationTimeout>10</AssociationTimeout>
<DimseTimeout>10</DimseTimeout>
</ConnectionParameters>
</Print>
<PrintImage name="addLogo">
<ImagePath>C:\ProgramData\Flux Inc\DICOM Printer 2\config\logo.png</ImagePath>
<X>1</X>
<Y>1</Y>
<Width>16</Width>
<Height>16</Height>
<Aspect>keep</Aspect>
</PrintImage>
</ActionsList>
<Workflow>
<Perform action="addLogo" onError="Ignore"/>
<Perform action="PrintOnDevice" onError="Discard"/>
</Workflow>
</DicomPrinterConfig>
Step 4: Restart the DICOM Printer 2 Service
After saving your configuration, you need to restart the DICOM Printer 2 service:
- Stop the service

- Start the service again

Testing Your Configuration
Now when you print to DICOM Printer 2 from your application, your logo should appear at the top left of each printed document.
If your logo doesn't appear, check that:
- The file path in your configuration matches where you saved the logo
- The logo file format is supported (PNG is recommended)
- The DICOM Printer 2 service was successfully restarted
Adding Facility Information (Text)
You can also add facility name or other text to your output by using the PrintText action, which works similarly to the PrintImage action. Here's an example configuration:
<PrintText name="addFacilityName">
<Text>ACME Medical Imaging Center</Text>
<X>50</X>
<Y>98</Y>
<Font>Arial</Font>
<FontSize>9</FontSize>
<Color>Black</Color>
<Alignment>Center</Alignment>
</PrintText>
Add this to your ActionsList section and include <Perform action="addFacilityName" onError="Ignore"/> in your workflow to display the facility name at the bottom of the page.
Advanced Customizations
DICOM Printer 2 allows for even more advanced customizations:
- Patient demographics: Extract patient information using a
ParseJobTextFileaction and display it withPrintText - Multiple logos: Add different logos at different positions on the page
- Conditional display: Only show certain elements based on document type or content
At $750 USD, DICOM Printer 2 is an affordable solution for customizing your DICOM output. Our fully-functional 60-day evaluation allows you to test all features before purchasing.
Related Resources
- DICOM Printer 2 Overview
- Printing to Film Using DICOM Printer 2
- Automating DICOM Printer 2
- Which DICOM Printer Do I Need?
Need help with your specific configuration? Our DICOM specialists can help customize DICOM Printer 2 for your unique requirements. Contact us for personalized assistance.